

-


常用软件
站-
热门城市 全国站>
-
其他省市
-
-

 15692118659
 白羽
2018-06-13
来源 :网络
阅读 2907
评论 0
白羽
2018-06-13
来源 :网络
阅读 2907
评论 0
摘要:本文将带你了解新手入门MAYA API插件编程的方法,希望本文对大家学Maya有所帮助。
我们知道,MAYA是一个基于结点的插件式软件架构,这种开放式的软件架构是非常优秀的,它可以让用户非常方便地在其基础上开发一些自已想要的插件,从而实现一些特殊的功能或效果。
在MAYA上开发自已的插件,你有3种选择,第一种是使用MEL语言开发脚本插件,使用MEL语言来编插件的最大优点是方便易学,MEL代码在MAYA上直接可以运行,不用任何辅助工具,在MAYA2008之前,MAYA的整个界面都是用MEL语言来写的,可见MEL语言也足够的强大,但是毕竟它是一个解析型的脚本言语,而且是一种面向过程的语言,因此,当我人要实现一些高性能的,或者是一些代码量非常大,对像关系非常复杂的功能时,MEL语言就是显得有点力不从心。这时候,你就有了第二种选择,基于C++语言的MAYA API插件,API插件的最大优点是高效,一般来说,用C++来写的API插件要比MEL语言插件运行速度要快10倍以上,试想一下,你如果要对一个有100万面的模型的每条边逐一搜索,用MEL来做,肯定要处理很长时间,但是用C++则可以非常轻松实现,可以说,MAYA的核心就是C++和OpenGL构建起来的。但是API插件,也有它的缺点,最大的缺点就是用必须要用C++编程,而C++又偏偏是公认的最难学的语言之一,很多计算机专科毕业的人对它都是一知半解,所以对于多数的美术制作人来说,也只能望而却步了。当然,在MAYA 2008之后,我们又有了第三个选择,那就是Python,这是一个在MEL与C++之间的折中选择,Python本身它是一种脚本语言,因此它也可以和MEL一样直接在MAYA窗口运行,而且也比较好学,同时时呢,它又拥有C++的面向对像的特性,因此呢,你可以用Python来开发足够复杂的程序。
可见三种方案,各有所长,没有最好,只有最适合,选用哪种方案,得视实际的需求来定夺。在这里,我详细说一下用如何C++来编写MAYA API插件,只为有这方面需求的朋友提供一个入门级的帮助,当然,前提是你要会C++编程。我们选用的编译环境是Maya 2010和Microsoft Visual Studio 2005,要编写MAYA API插件就得用到MAYA的开发包,没默认情况下,MAYA SDK会随MAYA程序一起被安装到相应目录下,如:D:/Program Files/Autodesk/Maya2010/include和D:/Program Files/Autodesk/Maya2010/lib,对于入门的朋友,可以使用MAYA API插件编程向导MayaPluginWizard2.0,这个向导能快速地都你在VS2005上搭建插件编程框架。打开文件夹D:/Program Files/Autodesk/Maya2010/devkit/pluginwizard,里面有安装说明,安步骤把MayaPluginWizard2.0.zip安装到VS2005中去。值得注意的是Maya 2010的插件工程向导是基于VS2005的,你如果用的是VS2008或其它VS编译器,这个向导安装上去可能没法正确运行,这是因为版本识别问题,你可以用记事本把文件文件MayaPluginWizard.vsz及MayaPluginWizard/Templates/1033/plugin.vcproj打开,把里面的8.0改为9.0,就可以在VS2008中运行了。
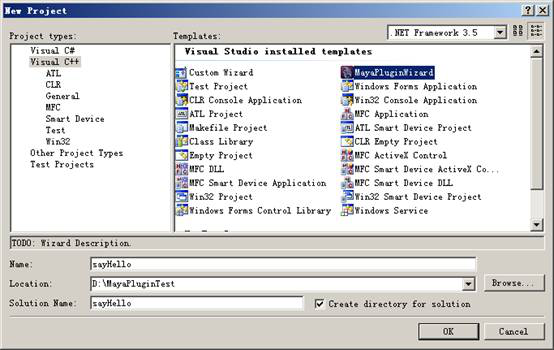
如果向导工具安装成功,打开VS2005的新建工程向导,我们可以看到以下的界面
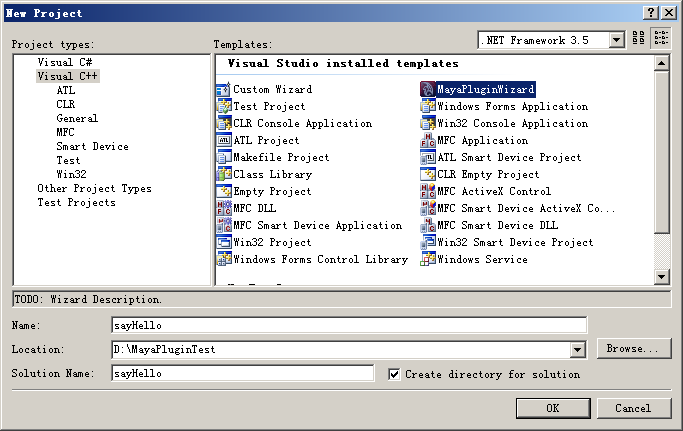
我们选择MayaPluginWizard来新建一个项目:
默认情况下,developer Kit location是指向C盘的,如果你的MAYA安装在基它地方,则需要指定相应的MAYA安装路径:
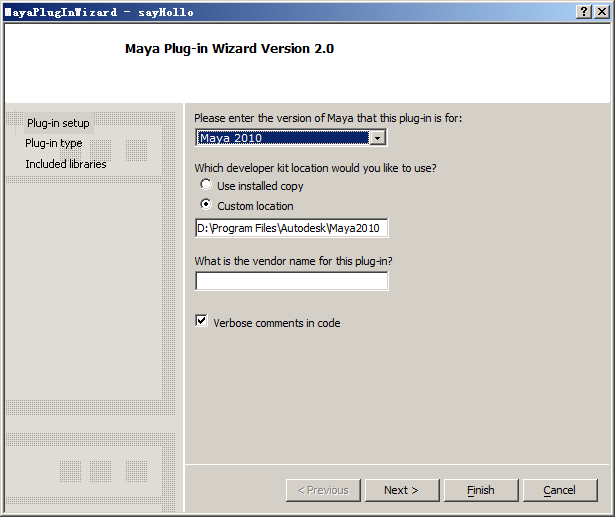
我们首先来创建一个最简单的MAYA插件,就是一个不带Undo/Redo功能的maya命令。
点Finish之后,工程就创建好了,代码很简单,整个工程只有一个CPP文件,代码如下:
#include <maya/MSimple.h>
DeclareSimpleCommand( sayHello, "", "2010");
MStatus sayHello::doIt( const MArgList& args )
// Return Value:
// MS::kSuccess - command succeeded
// MS::kFailure - command failed (returning this value will cause the
// MEL script that is being run to terminate unless the
// error is caught using a "catch" statement.
//
{
MStatus stat = MS::kSuccess;
displayInfo("Hello World!");
// Since this class is derived off of MPxCommand, you can use the
// inherited methods to return values and set error messages
//
setResult( "sayHello command executed!/n" );
return stat;
}
我们在doIt()函数中加入一行:displayInfo("Hello World!");
这个对于程序员来说近乎圣经般入门代码。然后进行编译,如果一切顺利,在我们工程的Debug文件夹中就生成了一个叫sayHello.mll文件,这就是一个MAYA插件了,安装MAYA插件也挺简单,把sayHello.mll文件拷贝到D:/Program Files/Autodesk/Maya2010/bin/plug-ins目录下,然后重新打开maya2010,从菜单window->settings/preferences->Plug-In Manager打开插件加载窗口:
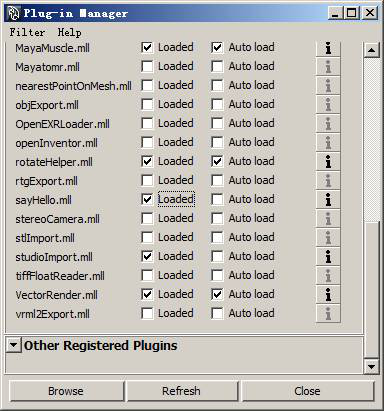
把我们的sayHello.mll插件加载进来,然后在我们的maya命令行窗口中输入sayHello;命令对插件进行测试。
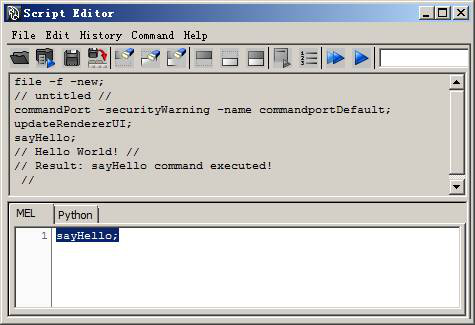
久违的Hello World!问候最终是成功地显示。
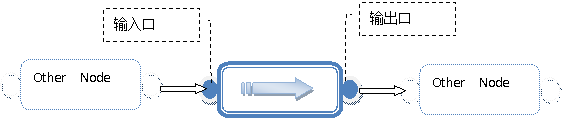
MAYA的插件大体上分为两大类型,命令(Command)和结点(Node),多数情况下,命令都是为结点服务的,下面我们来说一下如何编写一个简单的Maya结点。那么什么maya的结点呢?我们可以把结点想像为一个数据流处理器,每个结点,它都有输入接口,输出接口,及对数据进行处理的内核,如图:
 我们说MYAY是基于结点的插件式软件架构,所以在MAYA底层,对所有的数据都是通过把大量这的结点连接起来,一层层地进行运算和处理才得到最终的结果。这种基于结点的软件架构,其最大的好处就是制作人员可以根据需求把各种随意地连接起来,从而实现让制作人员可以最大限度在发挥自已的想像空间和创意能力。
下面我们来实现一个功能简单的结点,该结点只有一个输入接口和一个输出接口(注:一个结点可以有多个输入接口和输出接口),要实现的功能是把输入的数据乘以0.5变成原来的一半,然后输出。
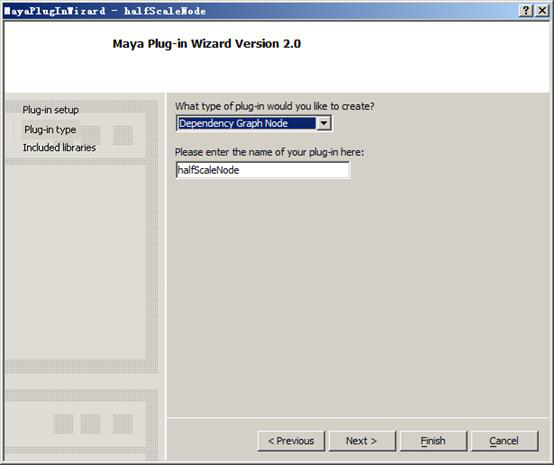
打开MayaPluginWizard,新建一个Dependency Graph Node插件
[
cpp] view plain copy
1. //
2. // Copyright (C)
3. //
4. // File: pluginMain.cpp
5. //
6. // Author: Maya Plug-in Wizard 2.0
7. //
8.
9. #include "halfScaleNodeNode.h"
10.
11. #include <maya/MFnPlugin.h>
12.
13. MStatus initializePlugin( MObject obj )
14. //
15. //  Description:
16. //      this method is called when the plug-in is loaded into Maya.  It
17. //      registers all of the services that this plug-in provides with
18. //      Maya.
19. //
20. //  Arguments:
21. //      obj - a handle to the plug-in object (use MFnPlugin to access it)
22. //
23. {
24.     MStatus   status;
25.     MFnPlugin plugin( obj, "", "2010", "Any");
26.
27.     status = plugin.registerNode( "halfScaleNode", halfScaleNode::id, halfScaleNode::creator,
28.                                   halfScaleNode::initialize );
29.     if (!status) {
30.         status.perror("registerNode");
31.         return status;
32.     }
33.
34.     return status;
35. }
36.
37. MStatus uninitializePlugin( MObject obj)
38. //
39. //  Description:
40. //      this method is called when the plug-in is unloaded from Maya. It
41. //      deregisters all of the services that it was providing.
42. //
43. //  Arguments:
44. //      obj - a handle to the plug-in object (use MFnPlugin to access it)
45. //
46. {
47.     MStatus   status;
48.     MFnPlugin plugin( obj );
49.
50.     status = plugin.deregisterNode( halfScaleNode::id );
51.     if (!status) {
52.         status.perror("deregisterNode");
53.         return status;
54.     }
55.
56.     return status;
57. }

halfScaleNodeNode.h
[cpp] view plain copy
1. #ifndef _halfScaleNodeNode
2. #define _halfScaleNodeNode
3. //
4. // Copyright (C)
5. //
6. // File: halfScaleNodeNode.h
7. //
8. // Dependency Graph Node: halfScaleNode
9. //
10. // Author: Maya Plug-in Wizard 2.0
11. //
12.
13. #include <maya/MPxNode.h>
14. #include <maya/MFnNumericAttribute.h>
15. #include <maya/MTypeId.h>
16.
17.
18. class halfScaleNode : public MPxNode
19. {
20. public:
21.                         halfScaleNode();
22.     virtual             ~halfScaleNode();
23.
24.     virtual MStatus     compute( const MPlug& plug, MDataBlock& data );
25.
26.     static  void*       creator();
27.     static  MStatus     initialize();
28.
29. public:
30.
31.     // There needs to be a MObject handle declared for each attribute that
32.     // the node will have.  These handles are needed for getting and setting
33.     // the values later.
34.     //
35.     static  MObject     input;      // Example input attribute
36.     static  MObject     output;     // Example output attribute
37.
38.
39.     // The typeid is a unique 32bit indentifier that describes this node.
40.     // It is used to save and retrieve nodes of this type from the binary
41.     // file format.  If it is not unique, it will cause file IO problems.
42.     //
43.     static  MTypeId     id;
44. };
45.
46. #endif

halfScaleNodeNode.cpp

[cpp] view plain copy
1. //
2. // Copyright (C)
3. //
4. // File: halfScaleNodeNode.cpp
5. //
6. // Dependency Graph Node: halfScaleNode
7. //
8. // Author: Maya Plug-in Wizard 2.0
9. //
10.
11. #include "halfScaleNodeNode.h"
12.
13. #include <maya/MPlug.h>
14. #include <maya/MDataBlock.h>
15. #include <maya/MDataHandle.h>
16.
17. #include <maya/MGlobal.h>
18.
19. // You MUST change this to a unique value!!!  The id is a 32bit value used
20. // to identify this type of node in the binary file format.
21. //
22. //#error change the following to a unique value and then erase this line
23. MTypeId     halfScaleNode::id( 0x02010 );
24.
25. // Example attributes
26. //
27. MObject     halfScaleNode::input;
28. MObject     halfScaleNode::output;
29.
30. halfScaleNode::halfScaleNode() {}
31. halfScaleNode::~halfScaleNode() {}
32.
33. MStatus halfScaleNode::compute( const MPlug& plug, MDataBlock& data )
34. //
35. //  Description:
36. //      This method computes the value of the given output plug based
37. //      on the values of the input attributes.
38. //
39. //  Arguments:
40. //      plug - the plug to compute
41. //      data - object that provides access to the attributes for this node
42. //
43. {
44.     MStatus returnStatus;
45.
46.     // Check which output attribute we have been asked to compute.  If this
47.     // node doesn't know how to compute it, we must return
48.     // MS::kUnknownParameter.
49.     //
50.     if( plug == output )
51.     {
52.         // Get a handle to the input attribute that we will need for the
53.         // computation.  If the value is being supplied via a connection
54.         // in the dependency graph, then this call will cause all upstream
55.         // connections to be evaluated so that the correct value is supplied.
56.         //
57.         MDataHandle inputData = data.inputValue( input, &returnStatus );
58.
59.         if( returnStatus != MS::kSuccess )
60.             MGlobal::displayError( "Node halfScaleNode cannot get value\n" );
61.         else
62.         {
63.             // Read the input value from the handle.
64.             //
65.             float result = inputData.asFloat();
66.             result *= 0.5;
67.             // Get a handle to the output attribute.  This is similar to the
68.             // "inputValue" call above except that no dependency graph
69.             // computation will be done as a result of this call.
70.             //
71.             MDataHandle outputHandle = data.outputValue( halfScaleNode::output );
72.             // This just copies the input value through to the output.
73.             //
74.             outputHandle.set( result );
75.             // Mark the destination plug as being clean.  This will prevent the
76.             // dependency graph from repeating this calculation until an input
77.             // of this node changes.
78.             //
79.             data.setClean(plug);
80.         }
81.     } else {
82.         return MS::kUnknownParameter;
83.     }
84.
85.     return MS::kSuccess;
86. }
87.
88. void* halfScaleNode::creator()
89. //
90. //  Description:
91. //      this method exists to give Maya a way to create new objects
92. //      of this type.
93. //
94. //  Return Value:
95. //      a new object of this type
96. //
97. {
98.     return new halfScaleNode();
99. }
100.
101. MStatus halfScaleNode::initialize()
102. //
103. //  Description:
104. //      This method is called to create and initialize all of the attributes
105. //      and attribute dependencies for this node type.  This is only called
106. //      once when the node type is registered with Maya.
107. //
108. //  Return Values:
109. //      MS::kSuccess
110. //      MS::kFailure
111. //
112. {
113.     // This sample creates a single input float attribute and a single
114.     // output float attribute.
115.     //
116.     MFnNumericAttribute nAttr;
117.     MStatus             stat;
118.
119.     input = nAttr.create( "input", "in", MFnNumericData::kFloat, 0.0 );
120.     // Attribute will be written to files when this type of node is stored
121.     nAttr.setStorable(true);
122.     // Attribute is keyable and will show up in the channel box
123.     nAttr.setKeyable(true);
124.
125.     output = nAttr.create( "output", "out", MFnNumericData::kFloat, 0.0 );
126.     // Attribute is read-only because it is an output attribute
127.     nAttr.setWritable(false);
128.     // Attribute will not be written to files when this type of node is stored
129.     nAttr.setStorable(false);
130.
131.     // Add the attributes we have created to the node
132.     //
133.     stat = addAttribute( input );
134.         if (!stat) { stat.perror("addAttribute"); return stat;}
135.     stat = addAttribute( output );
136.         if (!stat) { stat.perror("addAttribute"); return stat;}
137.
138.     // Set up a dependency between the input and the output.  This will cause
139.     // the output to be marked dirty when the input changes.  The output will
140.     // then be recomputed the next time the value of the output is requested.
141.     //
142.     stat = attributeAffects( input, output );
143.         if (!stat) { stat.perror("attributeAffects"); return stat;}
144.
145.     return MS::kSuccess;
146.
147. }
我们可以看到,现在的工程代码比刚才的命令插件要复杂多了,除了有对应的halfScaleNode.cpp和halfScaleNode.h文件之外,还有一个pluginMain.cpp文件,这是每个MAYA插件的入口,MAYA在加载该结点的时候,会自动运行initializePlugin( MObject obj )函数,因此我们就可以在这里做一些初始化的操作,其中最重要的就是要注册这个maya结点。
status = plugin.registerNode( "halfScaleNode", halfScaleNode::id, halfScaleNode::creator,
halfScaleNode::initialize );
if (!status) {
status.perror("registerNode");
return status;
}
所有自定义的maya结点及命令,都必须在初始化的时候注册,才能被MAYA识别和使用。注册的时候我们要注意的是,新的结点名和结点ID不能与已有的结点冲突,也就是说结点名和结点ID在整个MAYA系统中都必须是唯一的。所以在halfScaleNodeNode.cpp文件的开始有这样一个定义结点ID的代码
// You MUST change this to a unique value!!! The id is a 32bit value used
// to identify this type of node in the binary file format.
#error change the following to a unique value and then erase this line
MTypeId halfScaleNode::id( 0x00001 );
这里就提示我们必须要给该结点分配一个唯一的ID,要不就没法通过编译。我们可以把以上代码改为
//#error change the following to a unique value and then erase this line
MTypeId halfScaleNode::id( 0x02010 );
这样我们就可以正常地编译代码了。
接下来我们来详细说一下每个结点的核心运算函数:compute( const MPlug& plug, MDataBlock& data );前面我们说过,一个结点是由输入接口、输出接口及运算核心组成,这里的运算核心就是compute()函数,而输入输出接口则被封装在MDataBlock& data这个对像里面,我们通过相应的函数,就可以取得输入口和输出口所对应的地址,然后对这些数据进行操作:
MDataHandle inputData = data.inputValue( input, &returnStatus );
MDataHandle outputHandle = data.outputValue( halfScaleNode::output );
float result = inputData.asFloat();
这里,result所得到的就是输入数据的原始值,如果我们不作任何运算,直接把它赋值给输出接口
outputHandle.set( result );
那么得到的输出结果,也不会有任何改变。现在我们把输入数据乘以0.5然后再赋给输出接口:
float result = inputData.asFloat();
result = result * 0.5;
outputHandle.set( result );
很容易地,我们就达到了我们所想要实现的功能。把工程编译一下,得到一个叫halfScaleNode.mll的MAYA插件,和前面所说的安装方式一样,我们把halfScaleNode.mll拷贝到plug-in文件夹中,然后在MAYA插件管理器中加载该插件。
我们来验检一下该结点插件是否能正确运行。我们要在maya场景中建两个小球,在命令窗口中输入并运行以下mel代码:
polySphere;
createNode halfScaleNode;
connectAttr halfScaleNode1.output pSphere2.translateX;
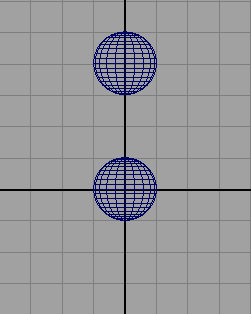
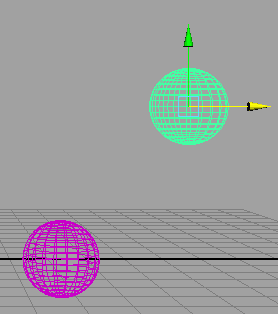
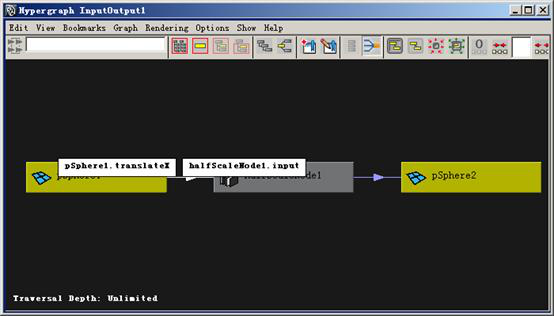
从超图上我们可以后清晰地看到,pSphere1的translateX属性被连接到halfScaleNode1的input输入口,经过运算后,输出给pSphere2的translateX属性。现在我们选择pSphere1然后沿X轴平称,我们可以看到,pSphere2会跟随pSphere1一起移动,但总是慢半拍,这正是我们想要的效果。
这样,一个简单的MAYA插件也就完成了。从上面的操作,我们也可以看到,一般一就,单独一个MAYA结点,如果用手工,是很难被正确连接起来的,所以多数情况下,结点插件都会结合mel脚本或API命令来一起使用。
以上,只是简单地介绍了编写MAYA API插件的入门知识,在实际应用中,一个MAYA API插件要比这个复杂得多,一个MAYA结点,它可以包括多个接口,而每个接口可以是各种类型的参数,如,浮点、整型、向量、矩阵等等,甚至可以是一个mesh对像或是一个二维数组。这些,我们都可以在每个结点的initialize()函数中生成和指定。
为了管理上的方便,我们可以在一个MAYA API插件中包含多个结点和命令,也就是说一个mll文件中可能有多个node和command,我们只要把它们都在pluginMain.cpp中的MStatus initializePlugin( MObject obj )函数进行注册就可以了。
本文由职坐标整理并发布,希望对同学们有所帮助。了解更多详情请关注职坐标常用软件之Maya频道!
 喜欢 | 0
 不喜欢 | 0


您输入的评论内容中包含违禁敏感词
我知道了

请输入正确的手机号码
请输入正确的验证码
您今天的短信下发次数太多了,明天再试试吧!
我们会在第一时间安排职业规划师联系您!
您也可以联系我们的职业规划师咨询:

版权所有 职坐标-一站式AI+学习就业服务平台 沪ICP备13042190号-4
上海海同信息科技有限公司 Copyright ©2015 www.zhizuobiao.com,All Rights Reserved.
 沪公网安备 31011502005948号


 资料领取
资料领取

 答疑解惑
答疑解惑

 技术交流
技术交流

 职业测评
职业测评

 面试技巧
面试技巧

 高薪秘笈
高薪秘笈


